When you physically remove an expansion card (blade) from the NEC SL phone system, it’s a good practice to virtually delete that blade from programming as well. This can help to avoid programming issues down the road. An example would be if your customer replaces their CO-Lines with a T1/PRI and no longer needs the CO-Line card. This Tech Tip applies to both the NEC SL2100 and NEC SL1100 Phone Systems.
First, Back Up The Phone System
We strongly recommend performing a database back up before deleting a blade. This precautionary step ensures you have the phone system’s data in case it needs to be re-loaded.
1. Connect to the phone system using PCPro
How to Connect to the NEC SL2100 or SL1100 Phone System for Programming
2. Click the “Download” button
(this is the big, blue downward arrow in the Home tab)
3. When the download is complete, click the “File” tab
4. Choose the “Save As” option
5. Type a file name for the back up
6. Click the “Save” button to save the back up file to your compute
Physically Removing the Blade
1. Power down the phone system using the power switch
2. Wait until the CPU LED’s are extinguished
3. For safety, disconnect the phone system from its power source
4. Using the appropriate tools, remove the blade from the NEC SL Chassis
5. Power up the phone system
Virtually Removing the Blade
1. Connect to the phone system using WEBPro
How to Connect to the NEC SL2100 or SL1100 Phone System for Programming
2. Click on the “Blade Configuration” icon at the top of the page

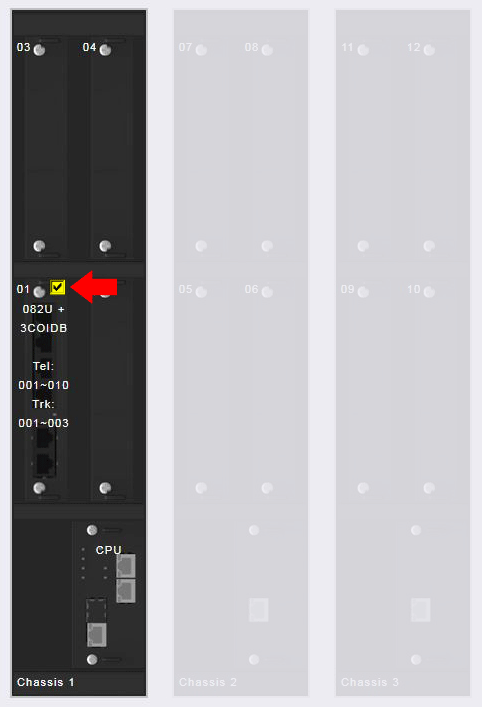
3. Click the check box on the blade you wish to remove

4. Click the “Delete Blades” button at the top of the page
5. Log out of WEBPro
6. Power down the phone system using the power switch
7. Wait until the CPU LED’s are extinguished
8. Power up the phone system
Verify the Changes Using WEBPro
1. Reconnect to the phone system using WEBPro
2. Verify that the blade is no longer recognized
Installing a New Blade
If you wish to install a different blade, power down again, install the blade hardware, then power back up. The new blade will be recognized during the power up sequence.