The ST500 is a mobile client app for Android and iOS that provides a mobile extension option for internal communications. This Tech Tip demonstrates how to program the ST500 in PCPro and how to create two profiles: one for Local (WiFi) calls and one for Remote (Mobile Plan) calls. A strong WiFi signal is essential for proper operation.
Although multiple calls are supported, the ST500 functions best with one call at a time. While the app can use the mobile network for calling outside the office, many factors may affect call quality.
Requirements
License Requirements
- One 3rd Party Station License [BE116746] is required per phone.
(The app is treated as a 3rd-party standard SIP phone.)
System Requirements
- Minimum SL2100 System Firmware v1.50 is required
- Firmware v2.00 is required for iOS push notification support
- Two static IP addresses are required
- Consult with your IT personnel to obtain:
- IP addresses
- Subnet mask
- Default gateway
- WAN address of the router (if using the app remotely, outside the office)
Get Connected with PCPro
This procedure requires access to the NEC SL2100 using the PCPro Programming Software.
To download PCPro or learn how to connect to the phone system, refer to:
How to Connect to the NEC SL2100 or SL1100 Phone System for Programming
PCPro Programming Steps
1. Program 10-63: DHCP Client Setting
- 10-63-01 – DHCP Client Setting: Uncheck the checkbox

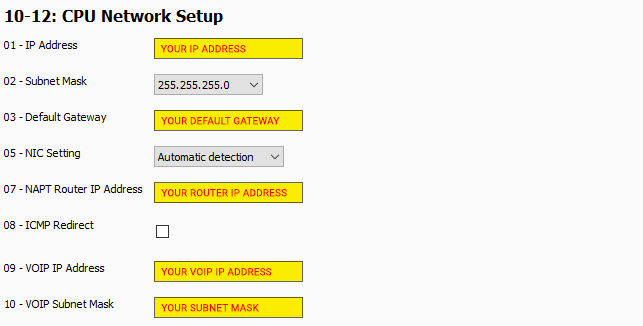
2. Program 10-12: CPU Network Setup
- 10-12-01 – IP Address: (set to your IP address)
- 10-12-03 – Default Gateway: (set to your default gateway)
- 10-12-07 – NAPT Router IP Address: (set to your NAPT router address)
- 10-12-09 – VoIP Address: (set to your VoIP address)
- 10-12-10 – VoIP Subnet Mask: (set to your subnet mask)
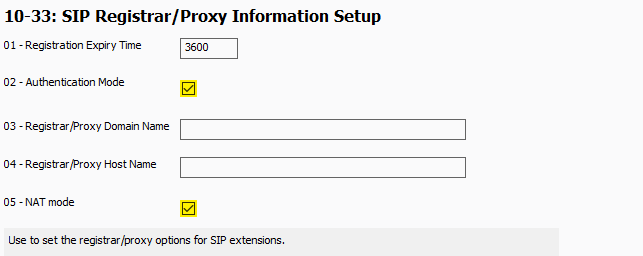
3. Program 10-33: SIP Registrar/Proxy Information Setup
- 10-33-02 – Authentication Mode: Check the checkbox
- 10-33-05 – NAT Mode: Check the checkbox
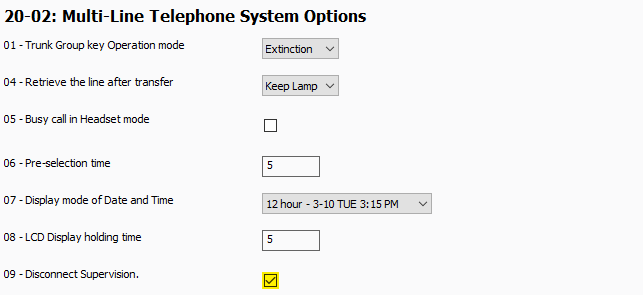
4. Program 20-02: Multi-Line Telephone System Options
- 20-02-09 – Disconnect Supervision: Check the checkbox
5. Program 24-02: Transfer System Options
- 24-02-15 – SIP Out of Range Timer: Set to “4”
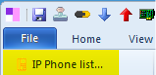
6. Open the “Filter Options” tab at the top of PCPro

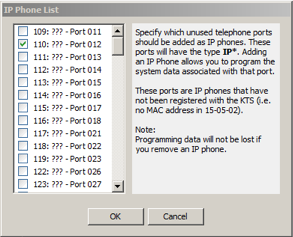
7. Click the “IP Phone list…” button
8. In the IP Phone List dialog box:
- Place a checkmark next to the extension you wish to use for the ST500
- Click OK
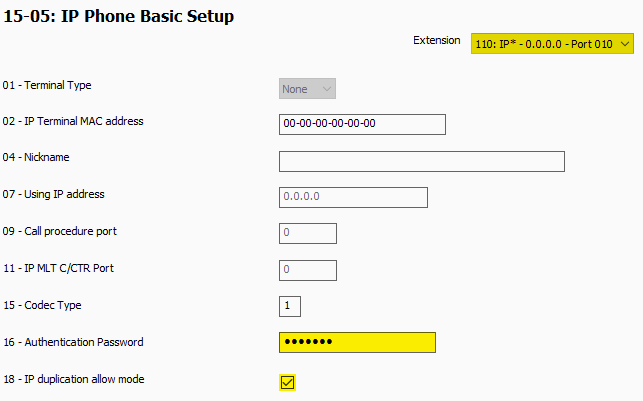
9. Program 15-05: IP Phone Basic Setup
Use the Extension drop-down menu (top right corner) to select the desired IP extension.
- 15-05-16 – Authentication Password: Type in a password
- 15-05-18 – IP Duplication Allow Mode: Check the checkbox
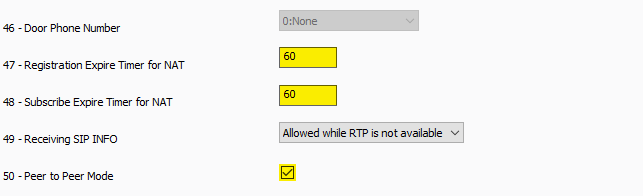
- 15-05-47 – Registration Expire Timer for NAT: Type “60”
- 15-05-48 – Subscribe Expire Timer for NAT: Type “60”
- 15-05-50 – Peer to Peer Mode: Check the checkbox
10. Upload your changes
11. Once the upload is complete, disconnect from the phone system
Installing the ST500 App on a Mobile Phone
⚠️ Tip: The ST500 app is available for both iOS and Android.
- Open the App Store or Google Play Store and search for “ST500”
- Install the app on the mobile device
- Open the app
- Accept the End-User License Agreement (EULA)
⚠️ Tip: The app will request access to Microphone, Contacts, Notes, and Camera. For best functionality, allow access.
- When prompted, enter the activation key:
1b8ff2a283623dae(for North America)
Setting Up Local & Remote Profiles
The ST500 uses profiles to manage connection types based on the user’s location.
You will create two profiles:
1. Local Profile (WiFi)
Used when the phone is connected to the same Local Area Network (LAN) as the SL2100.
2. Remote Profile (Mobile Plan)
Used when the phone is outside the office and not connected to the LAN.
The app will automatically select the appropriate profile based on the connection type.
Setting Up the Local Profile (WiFi)
- Create a new profile and name it “Local WiFi” (example)
- Tap OK
- On the Profiles screen, tap the newly created profile
- Enter the User ID
- This is the extension number selected in PCPro
- Enter the Password
- This is the Authentication Password from Program 15-05-16
- Tap Telephone System, then enter the following:
| Field | Value |
|---|---|
| SIP Server Type | SL2100 |
| SIP Server Address | IP address from Program 10-12-09 |
| Registration Server Address | IP address from Program 10-12-09 |
| SIP Server Port | 5070 |
| Connection | WiFi |
- Tap the Back button twice to return to the settings screen
Setting Up the Remote Profile (Mobile)
⚠️ Tip: Call quality when using mobile data may vary due to network conditions and is not guaranteed.
- Create a new profile and name it “Remote NAT” (example)
- Tap OK
- On the Profiles screen, tap the newly created profile
- Enter the User ID
- This is the extension number selected in PCPro
- Enter the Password
- This is the Authentication Password from Program 15-05-16
- Tap Telephone System, then enter the following:
| Field | Value |
|---|---|
| SIP Server Type | SL2100 |
| SIP Server Address | IP address from Program 10-12-07 |
| Registration Server Address | IP address from Program 10-12-07 |
| SIP Server Port | 5070 |
| Connection | Mobile Data Plan |
Router Port Forwarding (for Remote Use)
If the ST500 will be used outside the office, configure the router as follows:
- Forward Ports 5070 & 5071 to the IP address in Program 10-12-09
- Forward Ports 10020–10147 to the IP address in Program 84-26
- Disable SIP ALG on the router