Automatic registration allows an IP phone to be pre-programmed with an extension number and password using a Personal ID Index, streamlining deployment—especially for remote installations.
Get Connected
This procedure requires access to the NEC SL2100 using the PCPro Programming Software.
To download PCPro or learn how to connect to the phone system, refer to:
How to Connect to the NEC SL2100 or SL1100 Phone System for Programming
⚠️ Tip: We strongly recommend completing this procedure before deploying the phone to a remote location.
PCPro Programming Steps
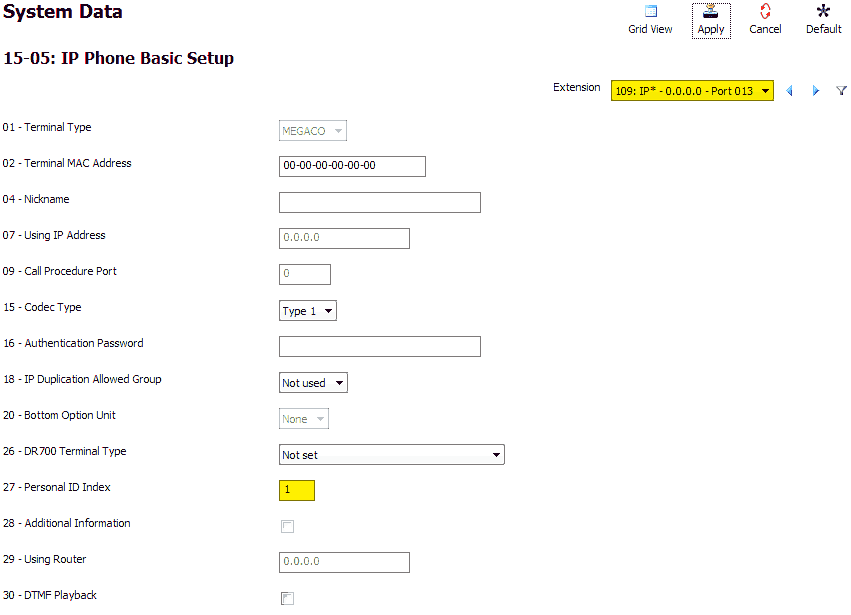
In this example, we’ll use extension 109, but you may substitute with any available extension.
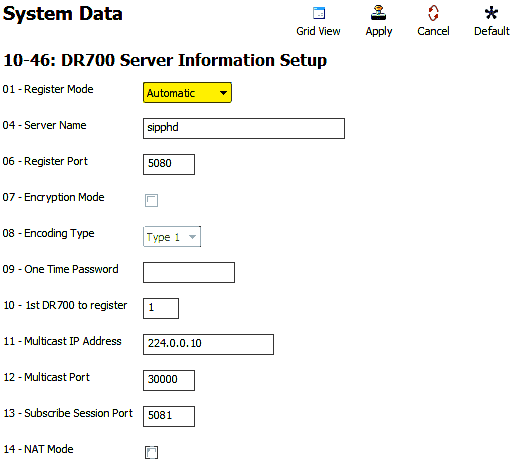
- Go to Program 10-46: DR700 Server Information Setup
- Set 10-46-01: Register Mode to
Automatic
- Set 10-46-01: Register Mode to
- Enable IP Phone List Access
- Click the Filter Options tab (top of the PCPro window)
- Click the IP Phone List… button
- In the pop-up, check the box next to each extension you plan to use with an IP phone or IP DECT handset
- Go to Program 84-22: DR700 Logon Information
- For Personal ID Index 001, enter:
- User ID:
109(your extension number) - Password:
1234
- User ID:
- Repeat for each extension you plan to use
- For Personal ID Index 001, enter:

- Go to Program 15-05: IP Phone Basic Setup
- Use the Extension dropdown to select extension
109 - Set 15-05-27: Personal ID Index to match the index used in Program 84-22 (e.g.,
001) - Repeat for all additional IP extensions
- Use the Extension dropdown to select extension
- Apply and upload your changes
IP Phone Programming Steps
Perform these steps on an idle NEC IP Phone that is connected to the phone system.
- Press the following keys in sequence:
Hold,Transfer,*,# - Leave the default username:
ADMIN - Press the Set soft key
- Enter password:
6633222 - Press the OK soft key
- Navigate through the following menu options:
- Press
2for SIP Settings - Press
1for SIP User - Press
1for SIP User ID - Enter the User ID from Program 84-22 (e.g.,
109) - Press OK
- Press
2for Password - Enter the password from Program 84-22 (e.g.,
1234) - Press OK
- Press Back
- Press
- Continue configuration:
- Press
2for Server Address & URI - Press
1for 1st Server Address - Enter the IP Address of your phone system (as shown in Program 10-12-09)
- Use the
*key to enter periods - Use the Clear/Back key to correct input if needed
- Press OK
- Press
- Press the Back key repeatedly until the soft key changes to Save
- Press the Save soft key
The phone will now register with the KSU and be ready for use.