Automatic registration allows an IP phone to be pre-programmed with a specific extension number and password using a Personal ID Index, making it ideal for remote deployments.
Network Requirements
- A DHCP server is recommended for plug-and-play setup.
- If DHCP is not used, you must manually assign:
- IP address
- Subnet mask
- Phone system should have a static IP assigned for:
- VoIP DB card
- VoIP DSP
- Router (on phone system side) must have:
- Static WAN IP address
- Proper port forwarding rules
- Disable SIP ALG on all network devices in both locations.
Get Connected
This procedure requires access to the NEC SL2100 using the PCPro Programming Software.
To download PCPro or learn how to connect to the phone system, refer to:
How to Connect to the NEC SL2100 or SL1100 Phone System for Programming
⚠️ Tip: We strongly recommend completing this setup before deploying the phone to a remote location.
PCPro Programming Steps
In this example, we’ll use extension 109, but you may substitute any available extension.
- Go to Program 10-12: CPU Network Setup
- 10-12-01: IP Address:
0.0.0.0 - 10-12-02: Subnet Mask:
255.0.0.0 - 10-12-03: Default Gateway: LAN IP of router (e.g.,
192.168.1.1) - 10-12-07: NAPT Router IP Address: Public WAN IP of router (e.g.,
48.200.10.37) - 10-12-06: NAPT Router Enable: Enable only if using SIP trunks
- 10-12-09: VOIP DB IP Address: IP address of VoIP Daughterboard
- 10-12-10: VOIP Subnet Mask: Typically
255.255.255.0
- 10-12-01: IP Address:
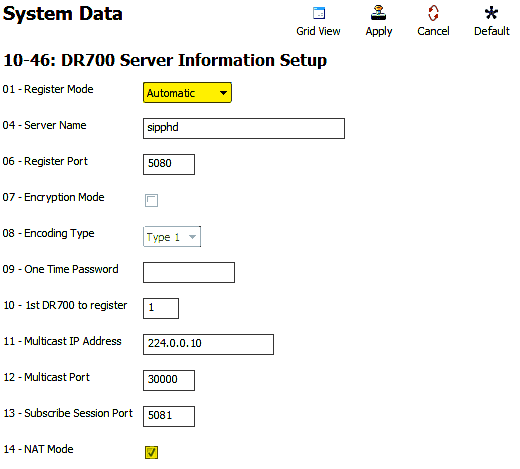
- Go to Program 10-46: DR700 Server Information Setup
- 10-46-01: Register Mode: set to
Automatic - 10-46-14: NAT Mode: check the box to enable
- 10-46-01: Register Mode: set to
- Go to Program 87-26: VOIPDB Basic Setup (DSP)
- For VoIP Gateway 1, assign an IP address that shares the subnet with 10-12-09
- Enable Extensions for IP Phones
- Click Filter Options
- Click IP Phone List…
- Check the box next to each extension you want to enable for IP phones
- Go to Program 84-22: DR700 Logon Information
- For Personal ID Index 001:
- User ID:
109(or desired extension) - Password:
1234(numeric only)
- User ID:
- For Personal ID Index 001:

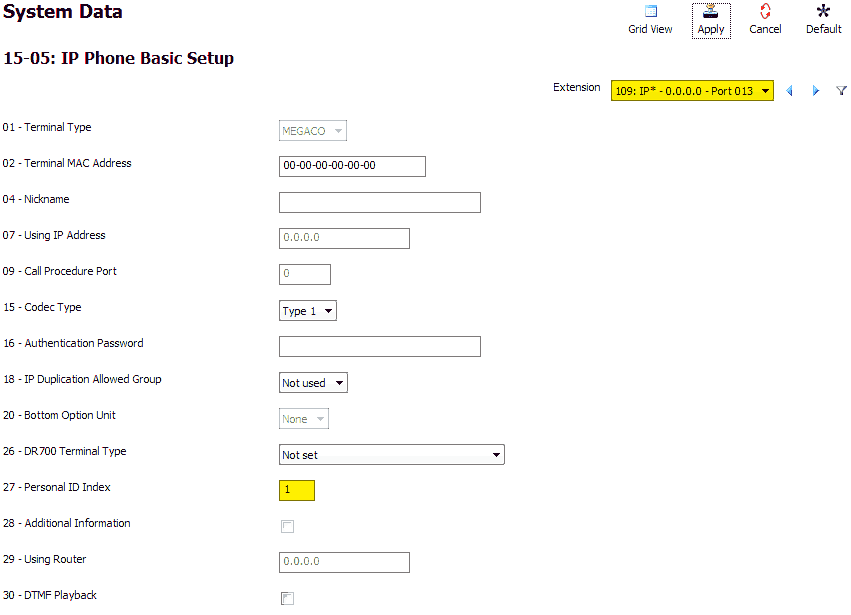
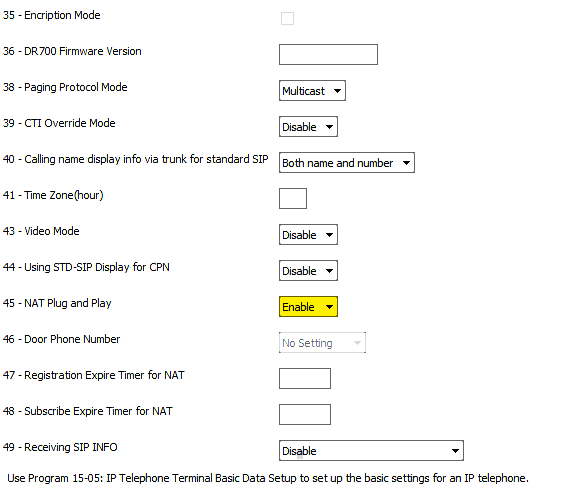
- Go to Program 15-05: IP Phone Basic Setup
- Select the desired extension (e.g.,
109)- 15-05-27: Personal ID Index: match to 001
- 15-05-45: NAT Plug and Play: set to
Enable
- Repeat for each extension
- Select the desired extension (e.g.,
- Apply and upload your changes
System-Side Router Port Forwarding
‼️ Important: Port forwarding exposes your KSU to the internet. Set this up carefully to avoid security risks.
Forward the following UDP ports to the IP from Program 10-12-09:
5080–5081: For SIP registration (IP Phones)10020–10083: For audio (RTP), forward to the IP in Program 84-26
⚠️ Tip: Avoid double NAT (router behind another router). Use bridge mode on ISP modem/router combos when possible.
IP Phone Programming Steps
Perform the following steps on an idle IP Phone connected to the network.
- Press (in order):
Hold,Transfer,*,# - Leave username as
ADMIN - Press the Set soft key
- Enter password:
6633222 - Press OK
Configure NAT Mode
- Press
2– SIP Settings - Press
7– NAT Traversal - Press
1– NAT Traversal Mode - Press
2– Dynamic
Dynamic mode lets the remote IP phone auto-detect the router’s WAN IP. - Press OK
Set WAN Mate IP
- Press
3– WAN Settings - Press
1– WAN Mate IP Address - Enter the public WAN IP address of the router on the KSU side
- Use
*to insert periods - Use Clear/Back to fix mistakes
- Press OK
Enter Extension Credentials
- Press Back until the main SIP menu appears
- Press
1– SIP User
- Press
1– SIP User ID- Enter:
109(extension) - Press OK
- Enter:
- Press
2– Password- Enter:
1234(from Program 84-22) - Press OK
- Enter:
Enter Server Info
- Press Back
- Press
2– Server Address & URI - Press
1– 1st Server Address - Enter the public WAN IP of the KSU router
- Press OK
Finalize
- Press Back until the Save key appears
- Press Save
The phone will now register and become active.